Showing posts with label Wear All the Babies!. Show all posts

Wednesday, October 16, 2013

Wear Your Baby Wednesday - Chevron Tie Dye Your Wrap!


My name is Amanda and I have a problem...I'm addicted to dyeing wraps.

Phew!  I feel better after getting that off my chest!

Let's quite the chit chat and get down to business now, shall we?

Supplies:
The key to getting the dye job to turn out in this chevron pattern is precise folding (which is why you need the iron).  I literally ironed a crease in each fold that I did and I do not think it would have been successful (especially with the thickness of the wrap once it was all folded up) if I had skipped this.

As usual, first wash your wrap with textile detergent.  You can use "normal" detergent if you're in a bind, but I'm a better-safe-than-sorry type gal when I'm permanently altering expensive fabrics.

Then you get to folding.  First you're going to accordion fold the entire length of the wrap.  I started with the tapers (which are super long on an Ellevill wrap, by the way) hanging off my ironing board:
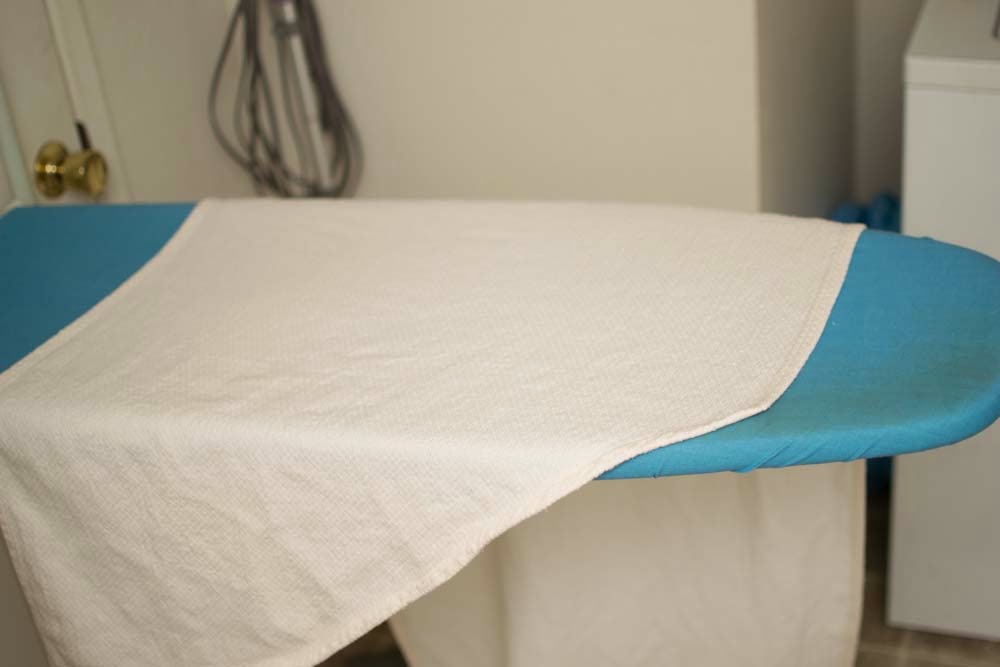
Then I reached to the other side and carefully pulled the fabric up to make my first accordion fold:
And I ironed the creases.

Then I continued for the entire length of the wrap being careful to make the folds as equal as possible and ironing in between each fold.
Once it was all folded and ironed I folded up the tapers of the wrap (and you guessed it - ironed those folds as well).


Next you'll take the top corner and fold it at a 90 degree angle.
And iron that crease (yes...you're still ironing ever crease).

Then you accordion fold that corner.

I tried to get more pictures, but because of the thickness of the wrap I couldn't take my hands off of it or else the folds (despite being ironed) came un-done.  All you have to do is continue to accordion fold the rest of the fabric on an angle and then secure it every couple inches with elastics.


The hardest part is over...woohoo!

Before I started this wrap I actually decided to try and "map out" the colors I was planning on using and it was a huge help while I applied the dye.  All I did was take screenshots (by hitting control+print screen) of the color chips from the Dharma Website then arrange them using Paint.  This is the pattern of colors I decided on:

Before you can start applying dye, soak the whole wrap in a soda ash solution for 30 minutes.  While my wrap sits in soda ash I mix my dyes.  And this wrap used a lot of dyes:
The colors were Dharma seafoam, paris green, turquoise, azure blue, wisteria, power berry, and jet black.

Then place your tied up wrap in a bin on top of a rack (so it doesn't end up sitting in dye) and apply your dye using squirt bottles:

Then let it sit.  Some people say overnight is fine.  Some people say 12-18 hours.  I like to let it sit for 18-24 hours just to be safe.

Then it's ready to be rinsed!  I'm a bad person and instead of running water over it to rinse it, I toss it right in the washing machine.  First I did a cycle with Synthropol then I did two full cycles without any detergent to make sure all the dye was out.  When you're removing your elastics, be careful...I've dyed a bajillion things and I still do stupid stuff like splatter blue dye all over my face.

And...you're finished!  Isn't she a beauty?


As usual, if you have any questions feel free to ask!  And don't forget to check out my other dye tutorials and babywearing posts here!!

Wednesday, October 2, 2013

Wear Your Baby Wednesday - Shibori Dye Technique aka MORE wrap dyeing!


Remember that time I told you I needed your help to win a free pod conversion?  Well, I won!  Woot!  And I decided I wanted it to be a rainbow zebra carrier.  Not sure why, but seriously, why not?  Well, it's not like there is a rainbow zebra wrap on the market I could just buy, so I had to dye my own.

This wasn't my first time doing a shibori dye.  I've actually done quite a few from back when I was making and selling ring slings, but I had never done a rainbow one and I had never done a whole wrap (those were just ring sling pieces).  My first attempt I had two things go wrong:

  1. I had every color on hand except red and I was too impatient to wait for professional red to come in the mail so I used Dylon dye (which is perfectly safe for baby carriers but not a "professional" dye) for the red and in the wash it bled on the rest of the fabric making anything white pink.
  2. Because a full wrap is so much longer than just a ring sling piece I had too many layers of fabric using my usual 6 inch PVC pipe and the dye didn't penetrate all the way through so only half the wrap got dyed.

So it looked pretty good until it came out of the wash and only half the fabric was dyed (not enough for a pod, but as you can see there was enough for a ring sling!) and what should have been white was pale pink.  So I started over, and this is where you should start if you want to dye a whole wrap!

Supplies:
**Whenever you are handling soda ash or dye wear gloves and a mask**

If you're only dyeing a ring sling piece a 6 inch PVC pipe should be enough (which you can find at Home Depot or Lowes), if you're dyeing a long wrap you'll need something bigger so the wrap doesn't have as many layers wrapped around it.  I used a trash bin. You want a trash bin that is as close to a perfect cylinder as possible.
Getting Supplies
Before you get started you need to get set up.  Essentially your fabric will be wrapped around your cylinder, scrunched together, then you apply your dye.  Obviously some of the dye will drip off which is why I like to do this in the bath tub which is what the tension rod is for.  You need to cut a hole in the center of the lid and the bottom of the trash bin big enough for the tension rod to fit through so you can suspend your trash bin above the tub.  The Sailor is an overachiever and built a structure out of scrap wood to put in the tub.  This really isn't necessary, a tension rod will work just fine.

Once you have your suspension system set up in the tub wash your fabric and soak it in a soda ash solution  for 30 minutes.

Then you're going to wrap your fabric around the cylinder as tightly as you can.  With the trash can the handles got in the way so I couldn't wrap it as tight as I would have liked but it isn't the end of the world.  Once it is wound around your cylinder put zip ties sporadically every couple inches.  These will be the completely white parts after you're done. (I didn't get a good picture doing this around the trash bin, but the very first picture in the collage above shows exactly what I mean)

Once your zip ties are tightened as tight as you can get them squish the fabric together.
With the trash bin it's important you use zip ties so once you squish the fabric together you can re-tighten them since the bin is slightly smaller at the base then it is at the top.

Then you apply dye using squirt bottles.  You could do all one color.  You could do a mixture of colors.  You could do the whole effing rainbow like me! (I used Chinese Red, Golden Yellow, my orange was just a mixture of those two, New Emerald Green, Electric Blue, and Imperial Purple).

Fun tip - to put the dry dye in the bottles (since the opening is so small) I just make little funnels out of wax paper; the dye doesn't stick to the wax paper at all and I just toss each funnel after each color.

If you're doing a full rainbow like I did, in order to get the spacing right first I did a thin stripe of red and purple, then I split the center with thin stripes of yellow and green...
Then I did the orange and the blue in the middle of the two blank parts and filled everything in so the colors were at least somewhat even.  And I saturated the hell out of that fabric.
The zip ties kinda kicked up dye and may have made a pretty cool looking mess...
Then I waited.  For 24 flipping hours.

I hate waiting, but it's worth it, I promise.

Then, since it was already in the tub I just turned on the water to rinse as much of the dye out as possible.

After I rinsed out most of the extra dye I cut off the zip ties, threw it in the washing machine, and washed it with synthropol.  Then I ran it through a whole additional cycle without any detergent just to be sure it was completely rinsed and dried it as usual in the dryer.

And it was beautiful....

There isn't quite as much white as I would have liked (because the trash bin collapses slightly under the zip ties and I couldn't get a "perfect" wrap around the trash bin since it isn't a perfect cylinder) but the colors are exactly what I imagined.  Once it is converted to a pod with a hood that has a zebra mohawk mane and ears it will be more than obvious that it was meant to be a rainbow zebra.

I mailed it off to Shiny Star Designs today but it'll probably be a while since they just opened up custom slots in mid-September.  I'll be anxious to see it, but it isn't like I can really wear W these days anyway because of my stupid back.  But I'll be sure to share pictures as soon as I get the finished carrier!!

As usual, if you have any questions don't hesitate to ask!  And in case you didn't notice (and you definitely wouldn't if you're viewing in mobile mode) I added another "tab" to the blog specifically for babywearing related posts (including my other dye tutorials) so go check it out here!  And even if you're only stopping by for this tutorial and have no plans of reading any of my other posts do a girl a favor and leave a comment!  It's nice to know when people are actually reading (and even better actually using the tutorials on) my blog!

Friday, September 27, 2013

Baby Deux - Weeks 21 and 22


I think I'm in denial about how quickly this pregnancy is going by compared to my last pregnancy.  I mean, how the hell is he the size of a spaghetti squash already!?

Since I last checked in my back has gotten significantly better.  It is nowhere near "healed" but it's tolerable.  Having The Sailor take the week off to let me rest has done wonders.  Fingers crossed it doesn't go to hell again once The Sailor goes back to work on Monday.

I'm tired a lot of the time still (I'm blaming the back pain though - being in pain is exhausting) and I get nauseous after I eat anything like 99% of the time, but for some reason I've suddenly started getting excited.  Maybe because we're well past the halfway point, maybe because we're making more concrete plans for the nursery and everything, or maybe because I feel the little guy moving all.the.time.  Whatever the reason, I've really started getting excited despite having another miserable pregnancy!  And when I see stuff like this and realize I'm already 6 months pregnant I get even more excited!
Source
Since I last checked in I had an appointment with the OB office on base.  BabyDeux is doing awesome; moving like crazy and his heart rate is great and he's measuring right on track.  I, on the other hand, ended up having an EKG because my heart rate was through the roof (over 200 bpm) but my blood pressure was super low.  EKG came back normal so they're attributing it to the stress on my body from the constant back pain.  Hopefully as my back gets better my heart will, too.

The other day I felt the little guy change positions (not just move, but like full on roll over) for the first time.  I, personally, hate that shit.  It makes me feel like an alien host.  I wish I had gotten a picture though because he was distinctly pushing my stomach out momentarily ::shudder::

And, oh yeah, I admit it...I effing love yoga pants.  Yoga pants or a long shirt with leggings are my go to these days.  I really just don't like maternity jeans, they continuously fall down so I'm constantly pulling them up which isn't attractive.  And with fold over yoga pants I can just not fold them over and it's like wearing full panel pants!  Which, since my belly exploded over night, is awesome!
22weeks5days
^^totally regretted wearing Wes later that day.  He was having a meltdown and The Sailor had ran out and he kept grabbing his wraps and signing please so I couldn't help but put him up there...but it killed my back and I ended up in bed at like 6:30 that night.

That's all for now...I've been scoping out cribs and once we get that we'll start really putting the nursery together so that will be a lot of fun posts.  Until then you'll just have to deal with my super boring pregnancy updates!

Tuesday, September 17, 2013

Baby Deux - Weeks 18, 19, and 20


I really do suck as a pregnancy blogger, haha.  Especially since as I'm typing this I'm 21w3d.  Oops, it's my blog I'll do what I want to.

So yeah, two Thursdays ago I did something to my back.  At this point the doctors think I ruptured a disc in my lower spine but we can't do any imaging to properly diagnose it since I'm pregnant.

I'm in so.much.pain. I've spent the better part of the last 11 days in tears or on the verge of tears. I can't be upright (sitting or standing) for more than about a half hour before the pressure/pain in my lower back actually makes me start seeing stars and eventually start to black out.

I'm angry at my body for failing me.
I'm angry at my insurance for not covering chiropractic care. It was the only thing that made me feel any better last week but we don't have the money for me to keep going.
I'm angry at the bored house wives who were supposed to be my friends who have been talking behind my back accusing me of faking the injury for attention.
I'm angry at my husband's squadron for giving him crap about asking to take leave because apparently the jets he works on need him more than I do.
And most of all I'm angry at myself for not being able to take care of my toddler the way he deserves. Yesterday morning I was laying on the floor trying to play with him and he kept handing me toys and signing please, but I could barely move. I can barely pick him up. I might have to put him back in diapers even though he's doing so well potty training because he only likes to go on the big potty and I'm struggling to lift him up onto it as often as he needs to go.
Not to mention I hate the fact that I can't go a full day without taking any pain killers despite the fact that I know they aren't great for my unborn baby. I try so desperately to just suck it up, but there's only so much pain I can handle.

Now that I've gotten that off my chest I can talk about some of the more fun things that have been going on the past 3 weeks!

We have started clearing out our third bedroom!  We sold the large pieces of furniture and I've started figuring out where everything else (all my crafting stuff) will end up.  And we sold our old stroller (the Baby Jogger City Mini - which I loved, but only works for one kid) and bought a used Britax B-Ready which we can get a second seat for so W and BabyDeux can both ride in it.  The only problem with it was the previous kid had taken a bite out of the foam on the bar, so I sewed a "sleeve" for it out of The Sailor's uniform material and embroidered our last name on it.  I actually really like it, so I'm kinda glad the last kid chomped on it!
I also picked up some cute Dr. Seuss stuff from the cheapie section at Target to be used in the Nursery.  I'll probably cut out and frame the bags ($0.50 each) and use the plates as part of a DIY mobile ($2 each - they're holographic).
We had our anatomy scan and everything looks perfect.  BabyDeux is super active!!!


I got a men's shirt from Goodwill for $2.99 that I grad-dyed and am slightly obsessed with...
I sold one of my wraps to buy a wrap specifically for BabyDeux!  I've mentioned before that bamboo blends are super soft and great for newborns, so I bought Oscha Starry Night Midnight which is 70/30 cotton/bamboo.  I plan on grad dyeing it before he gets here, probably a deep blue.
And I finished my first big project for the nursery!  I plan on doing a post specifically for it, but here's a teaser for what it is with some pictures we took to celebrate hitting the halfway point with this pregnancy...
Me with my cane - yes, my back is so bad I need a cane to get around by the end of the day

Say hi to your baby brother, W!


Not much else to report...fingers crossed for me that my back starts getting better soon, ok?


Saturday, September 14, 2013

I need YOUR help!!!

Remember back in Babywearing 101 when I mentioned I had never used a pod carrier before?  Well, I entered a design contest with one of my favorite conversion artists to win a free pod conversion and I'm one of the finalists!

All I need you to do is go to their Facebook page and "like" ^that^ picture!!  THAT'S IT! If you ever want me to return the favor I would be more than happy to :-)

While you're there be sure to check out some of the amazing carriers!  If you ever decide to order be sure to let them know Amanda Hinson sent you!

Thanks again!

PS - I'm trying to put together a pregnancy update (weeks 18,19,20) but I seriously hurt my back and can only sit up straight for so long.  It'll be coming soon though, promise!

Wednesday, September 11, 2013

Wear Your Baby Wednesday - Newborn Ring Sling TUTORIAL

As I promised in my ring sling tutorial post, I made a newborn in a ring sling tutorial after my good friend had her baby! (Be sure to check that post out if you haven't already, it has some great safety and comfort tips as well as a video to help you properly thread your sling.  Also be sure to check out my "Babywearing Safety" post which has a link to a whole slew of information specifically about how to safely wear a newborn.)

A few things first...

Some people will tell you to wear newborns with their legs in the carrier, but this puts unhealthy pressure on their ankles and feet so I do not recommend it.  In the video you'll see it is completely possible to safely wear even the newest of newborns with their feet out.

You'll notice in the video before I pull the bottom rail up between the baby and I to create a good "seat" I actually pull most of the fabric up along his back.  You do not want a lot of fabric bunched up in your baby's knees especially with a newborn because it can inhibit circulation.

Newborn-wearing isn't easy.  Their legs are tiny and they're floppy and have no head control.  But if you have a baby who insists on being held 24/7 it can save a new parent's sanity.  Just keep practicing and it will get easier.  Remember to always practice with a happy baby!  The best time to start trying a new carrier with any age baby is when they have a fresh diaper and are freshly fed.  The happier they are the easier it will be.

Newborns don't have any neck control and the muscles in their throat are still barely developed.  You have to make sure they don't go chin to chest to prevent suffocation.  This is true for any scenario (in a swing, car seat, anywhere) not just a baby carrier.

You'll notice I'm using the ring sling that I dyed and sewed for my friend in the video :-)


The following screen shot is just so you can "pin" directly to this page...


Template by BloggerCandy.com | Header Image by Freepik