Wednesday, August 28, 2013

Wear Your Baby Wednesday - Another Technique To Dye a Woven Wrap!

Sorry I've been a little MIA lately - W and I have been crazy busy (next week he has two different classes at the local Family Resource Center, I have BabyDeux's anatomy scan, and we plan on going camping next weekend) plus I've started projects for BabyDeux's nursery already (you should seriously be excited about that)!  But today I'm going to put together a tutorial for a different dye technique that you could use to customize your own woven wrap or ring sling!

In case you missed the first dye tutorial post you can find it here or if you missed my ring sling sewing tutorial that can be found here.


Like the photo says, this is a Low Water Immersion (or LWI) dye technique.  This is a great technique if you want the different colors to "dance" together but don't love the look of a traditional tie dye (which I, personally, do not).  A little back story...a friend of mine had gotten a Kokadi Diorite Stars woven wrap but never got the hang of wrapping.  At first she asked me to help her sell it, instead I encouraged her to have half of it turned into a ring sling and even offered to slingify it myself as partial payment towards buying the other half of the wrap.  Best decision ever.  She loves the simple black and white star pattern and is getting the hang of the ring sling, but I wanted to spice my half up a bit before slingifying it so obviously I dyed it!

Supplies
  • Textile Detergent
  • Dye - I like Dharma Dyes (I used a little turquoise, a little Carribbean blue, jade green (which really has a blue look to it), and Imperial purple)
  • Soda Ash Fixer
  • Squeeze bottles
  • Gloves
  • Mask
  • A plastic bucket or bin just big enough for your fabric to be compactly squished into
  • Woven wrap or a fabric appropriate for babywearing (I would only recommend Osnaburg or 100% linen)

Always wear gloves and a mask when handling dye or soda ash

As always, wash your fabric with textile detergent before starting a dye project.

Then take your dry fabric and squish it into whatever container you have available that it will fit in compactly.  My sling piece fit nicely in the bottom of a 5 gallon bucket.  You can twist and turn it as much or as little as you like.  The more twisting and turning you do, the more dynamic the colors will be in the end.
Next mix your dyes in the squirt bottles, I actually made my dye highly concentrated because I wanted intense color.  This is something you'll have to test out to figure out what you prefer.  

Then you want to saturate your fabric with dye, but not add so much that your fabric begins to float at all.

If you want there to be white or blank spots left you don't have to do this...I didn't want any actual white spots left, so I actually filled a squirt bottle with warm water and slowly poured it over all of the fabric while kind of nudging at it to make sure that the dye penetrated all of the folds and overlaps.

Let your fabric sit as is for 30 minutes

Then mix up your soda ash solution and add enough that it completely covers the fabric.  

Wait 12 to 24 hours.  The longer you wait, the more intense the colors will be.

Rinse and wash your fabric until the water runs clear.  I actually just tossed the whole bucket in the washing machine did two cycles without detergent, a cycle with textile detergent, then an additional cycle without detergent and my wrap was good to go.

Common sense made me believe that this technique would be a big hot mess.  That letting the colors run together like that would just muddle them all up and it would either look brown or just purple from the mix of dyes I used.  But I trusted the many tutorials I referenced and lucky for me, it turned out glorious!

I had originally planned to have the primarily black side be out, but I actually fell in love with the mixing of colors on the white side...


So much cooler looking, right?


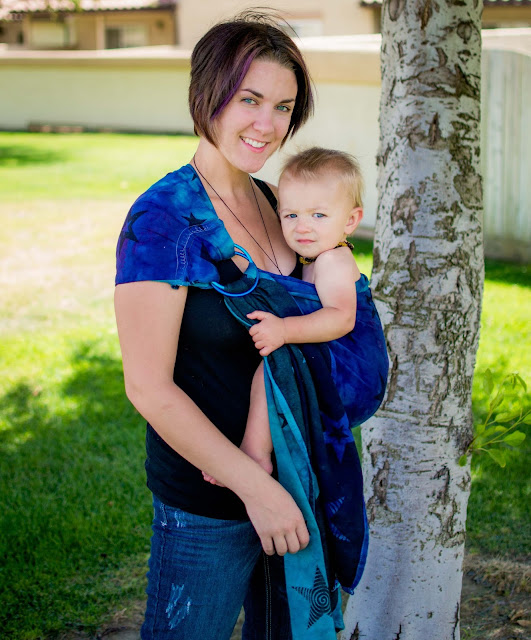
Then I slingified it using the same method I linked to at the beginning of this post and it was love at first carry!  (Sorry W looks like such a turd, he did not want to model, he wanted to play on the ground)


I love everything about it.  For one, Kokadi wraps are heavenly soft.  I'm obsessed with how the dye job turned out.  And I'm obsessed with how the shoulder of the sling turned out!  I chose to use one blue and one turquoise ring and the blending of colors and placement of stars is just flipping awesome.

Now I have to be slightly sentimental for a second.  I happen to notice that one of the pictures of use modeling the sling was really similar to a picture taken last August (so they're a year apart almost exactly) - where did my precious bald baby go...?

Thursday, August 22, 2013

Baby Deux - Weeks 16 and 17

In my excitement to announce that we found out Baby Deux is a boy, I completely forgot to do a weekly update!

Obviously we had another ultrasound last week since we found out we're having another little dude...

Pensive baby (he's holding a hand up to his chin/mouth)

 Look at that, there's a penis inside me...(I'm so mature, I know)

Yay for a strong beating heart!

So yeah, in case you couldn't tell by my little collage, I'm still not a fan of pregnancy!  Pregnancy acne has hit me full force, although it's a little different than with W.  With W I had a bunch of deep, cystic pimples that actually hurt my face.  This time they aren't as deep, but there's more of them.  A friend's husband sweetly said, "aww...you're glowing."  And I was like, "sorry dude, that's just acne."  ::whompwhomp::

My hair growing faster is awesome since I'm actually trying to grow it out (I chopped it off completely to a short pixie in October and got super bored with that in like February).  What isn't awesome is my hair has become so coarse that shaving my legs is physically painful.  At first I thought I just needed a new razor, but changing it didn't help at all.  I have to exfoliate my legs, shave with shaving cream (which I don't usually use), exfoliate again, and shave again just to have remotely smooth legs.  It's insane!  

And to top it off I have at least one intense headache a day lasting anywhere from 30 minutes to a few hours.  I also joke that this baby is mean because I get stabbing cramps that feel like he's stabbing me.  The OB I saw said that (along with the cervical pressure I was experiencing) is normal because I didn't give my uterus time to completely heal after having W...I think she's a crackhead because I've never heard that before!  Either way, it isn't pleasant.

The only thing I'm enjoying about being pregnant this time around is planning the nursery.  It's going to be a-maz-ing!!!  That and super sweet moments with W like when he's nursing in bed in the morning and he just starts rubbing my little baby bump, which he never did before...
Here's to hoping I catch some of that second trimester energy soon!!!

In all three of these pictures I'm wearing the pregnancy jeans I made..

Wednesday, August 21, 2013

Wear Your Baby Wednesday - Ring Sling Basics VIDEOS

For today's edition of Wear Your Baby Wednesday I made not one, but two videos demonstrating some ring sling basics.  The first is how to thread your ring sling and some basic tips that will help make it easier to adjust your sling when you're putting your baby in and the second is how to put a baby in a ring sling.

Some things to keep in mind:

Always keep a hand on your baby while putting them in the sling.  W has been in a ring sling a bazillion times, he knows what's up.  I could get away with not holding onto him the whole time because he knows to hold onto me.  It'll take some time and practice for both you and baby before you get to that point.

There is a learning curve for your baby as well as for you.  On a similar note to my previous tip, the first time you try to put your baby in a sling odds are they aren't going to cooperate...don't give up.  It's as new to them as it is to you.  You'll be most successful if your baby is not hungry, in a good mood, and relaxed.  The more you use your sling the more they'll learn to "help" you put it on.

Once your baby is in the sling:

  • Make sure the fabric is going all the way from one knee to the other and their knees are higher than their bum (aka having a good, deep seat).  This will get much easier to accomplish as your baby gets bigger.
  • Make sure the fabric is spread over your shoulder not bunched up by your neck.  You'll notice when I'm putting it on I actually put the sling on my shoulder as if it is a cap sleeve, which helps prevent it from riding up to my neck.
  • Whether you made your sling yourself or you bought a "professional" one, check the seams regularly to make sure they aren't falling apart.
  • With littler babies who don't have the best head control make sure their chin is never pressed against their chest (more on that here in Babywearing 102)
  • Always have your baby high enough that they're "close enough to kiss."


Since putting a newborn in a ring sling is very different than putting a toddler in one I'm going to try and steal a friend's newborn within the next few weeks (after he's born) to make a newborn how-to video so I won't have to wait until February!

But for now please enjoy these tutorials!!


The following screen shots are just so that you can pin directly to this page...


Monday, August 19, 2013

Homemade Cheese Cracker Recipe!

Today's edition of MmmMmmMmm-Monday is geared towards the kiddos (or for full grown men who like to eat like kids - like The Sailor)!

W could eat Cheese-Its and Gold Fish all.day.long.  So, instead of continuing to pump him full of artificial colors and preservatives (or having to sell a kidney to be able to afford the organic kinds) I decided to try my hand at making my own!  It is a super simple recipe that I originally found here.

Ingredients

  • 1 1/2 packed cups of finely grated sharp cheddar (all I could find was normal cheddar and it worked just fine)
  • 4 tablespoons unsalted butter (softened)
  • 1 teaspoon salt and the recipe called for another 1/2 tsp to sprinkle on top but I chose to omit that and they turned out just fine
  • 1/2 teaspoon black pepper
  • 1/2 cup plus 2 tbsp all purpose flour
  • 2 tbsp cornstarch
  • 2-3 tbsp water (I actually only used 1)

Instructions

  • Using a stand mixer with the paddle beater, combine cheese, butter, 1 teaspoon of salt, and pepper until it starts to stick to the sides of the bowl, 1/2-1 minute
  •  Add flour and cornstarch and mix until combined, about 1 minute
  • Add 1 tablespoon of water and mix briefly until dough ball forms. Add another tablespoon of water, if needed. 
  • Wrap in plastic, press the ball of dough into a disc, and refrigerate until chilled, about 30 minutes.
  • Adjust oven racks to upper-middle and lower-middle positions and heat over to 375.
  •  Line 2 rimmed baking sheets with parchment paper. 
  • Unwrap the dough and place on a floured surface. Roll to 1/16 inch thickness. 
  • Cut into 1-inch squares using a beveled-edge ravioli cutter. Separate the different pieces and transfer to baking sheets. 

  • Sprinkle with remaining 1/2 teaspoon of salt (I omitted this)
  • Bake until light golden around the edges, about 18 minutes, switching racks and rotating sheets halfway through baking. I let mine cook the full 18 minutes and some of mine burned, definitely check on them often during the second half of baking!!
  • Let cool completely on baking sheets.

They turned out really delicious and made my house smell great!  But, it's a lot of work (rolling, cutting, separating) and doesn't made a ton of crackers.  But it's way better than store bought and less expensive, so I'll continue to make them for my little man!

Obviously, the are W approved!


 Cheese crackers make you thirsty!!!

Thursday, August 15, 2013

BabyDeux is a...


That's right...BabyDeux is a BOY!  W is going to have a little brother!!


Fun fact about that banner...I had all the supplies needed for it on hand!  One of the benefits of being a craft hoarder! lol

I made W a t-shirt for the shoot, but you can barely tell what it says ("I'm getting a Baby Bro")


This is my "I'm pregnant so I should stand like this" pose...
The Sailor and I laughing...
This one would be really good if The Sailor's head wasn't completely blown out...

And this is my, "Oh shit, I'm gonna be the mom of two boys" face...

DIY Cinch Sack (For Legos, Blocks, Etc.)

Eek...it's been a while...but no need to fear - I haven't disappeared!  We're just having a super busy month and on top of that I've started my first DIY project for BabyDeux's nursery!!!  (But more on that later.)  Today I have a quick tutorial for you to sew your own cinch sack for toys!!

I've seen advertisements for a Lay n Go playmat/storage bag a few times and always thought it was really cool...but not for $65!!!!!!!! And let's be serious, it's just a cinch sack you throw toys in, so I decided to make my own!

Super easy project - all you need is fabric for the outside, fabric for the inside, and some ribbon!  I decided to use PUL for the outside in case I ever wanted to use it outdoors (PUL is waterproof - this is the fabric I got), fleece for the inside so it was comfortable to sit on, and ribbon I just happen to have on hand!  I got a yard of each of my fabrics and have plenty to use on other projects!

First lay your fabric out, one on top of the other, and cut as big of a circle as you want/can fit.  Exact measurements don't really matter.

Next you'll need to sew 2 buttonholes large enough for your ribbon to fit through about an inch or an inch and a half from the edge of the outer fabric.  Most sewing machines have "automatic buttonholes" or if yours doesn't you'll just need to sew a rectangle with a tight zig zag stitch to prevent the fabric from tearing or fraying (then use a seem ripper to cut the actual hole).

I also chose to embroider "Blocks" beneath the buttonholes just because I can.  Obviously it isn't necessary and completely cosmetic!

Now, lay the two circles on top of one another with the wrong side facing out and pin them together.  Then sew as close to the edge as possible and leave a little section open so you can turn the whole thing right side out. (The yellow line is the seem you're sewing)
Turn it right side out and hand stitch the hole you left closed.

Then you'll sew another seem a few inches in that is right beneath the buttonholes.  The blue lines are the buttonholes then the green line is the seem you're sewing now.
Finally, thread a piece of ribbon that is long enough that you can lay the whole thing flat through the buttonholes and around the edge.  Voila!  Your very own Lay n Go toy sack!

W is still trying to remove the blocks and put them back in the bin where we used to keep them, haha.  I'm hoping he'll get over that eventually...


Mine isn't quite as big as the $65 one I linked to earlier, but it works just fine for us!


It makes clean up a breeze!  I just tell W to put all the blocks on the blanket and he's happy to help!


Template by BloggerCandy.com | Header Image by Freepik