 |
| Personal Photo |
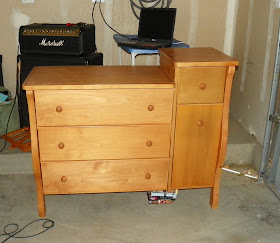
Step one was to take out the drawers, remove the door (on the right), remove all the knobs, scrub that sucker down, and sand it. Which, by the way, I finally bought a sander and it's the best thing that ever happened to me. I'm just sayin' though...
 |
| Personal Photo |
All that is boring. Let's face it. But now is when it gets exciting...the drawers on the left.
I've wanted to infuse as much color into the nursery through furniture/decorations since the walls are white and the carpet is beige. I could paint it, but we'd have to paint it back before we left. The last thing I will be wanting to deal with when we move (probably/hopefully in two and a half years) is painting. So I decided to decoupage the drawers using brightly colored fabric.
I actually got the fabrics on sale from Joann's and they're perfect.
 |
| Personal Photo |
 |
| Personal Photo |
I waited about 24 hours and then I sealed the whole thing with another layer of Mod Podge. This time I diluted it slightly with water (about 2/3 Mod Podge, 1/3 water) and again used a sponge brush to saturate the whole face of the drawer. While that started to dry, I painted the fronts of the small drawer and door (for the right side of the dresser) an off-white color (to match the ribbon). I had considered applying fabric to these as well, but I thought that would be a little overwhelming.
The last step was to put on the new knobs I got (just clear acrylic ones; I got them at Target) and bring the whole thing upstairs! Since I'm broken (damn back problems), I was lucky enough that Navy Wife Kim and her 12 year old son were willing to carry it upstairs, et voila...
 |
| Personal Photo |
 |
| Personal Photo |
Don't worry, I am getting a cover for the changing pad! The one I want is currently back-ordered though:
 |
| Source |
 |
| Personal Photo |
Oh, and in case you were wondering, the little white dog thing is a night light. I got it from Marshall's. It can glow in a variety of colors and is actually portable (it's sitting on the charging base in the pictures). I think it's precious and it matches my totally general "theme" - which is animals (any animal, lol) and blue, green, and orange, haha.
So, my first project for "decorate the nursery month" is officially done! Next up is my DIY mobile, which I'm also very excited about (and shouldn't take nearly as long as the dresser did). If you have any questions about how I completed the dresser, ask away, and of course I'll never turn down compliments on my work...
Until next time...

I LOVE what you did with this! It looks SO much better than it did when it started. I'm so impressed, I want you to come over my house and make one for me. :)
ReplyDeleteThat is SO cute! Love the colors, too!
ReplyDeleteIt looks great! I really want to try mod podge. I love the diea of using it on furniture. The prints are so fun! :)
ReplyDeletelove it, I just went to Joanne fabrics today and got some fabric to cover canvases for wall art. It was only 4 dollars a yard on clearance and made for cheap pretty wall art.
ReplyDeletelove this - it came out great!
ReplyDeleteI love it! Great job!
ReplyDelete