Since I had
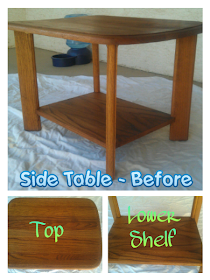
successfully completed my first furniture refinishing project, I decided to get started on my next. This time I decided to redecorate an end table I had gotten off Craigslist for our living room. Here it was at the beginning of the project:
 |
| Personal Photo |
There was nothing
wrong with it necessarily, but it was boring. And I don't like boring. And I have a lot of time on my hands since I don't have a baby (yet) but still don't have a job. In case you forgot, my color scheme for my living room is yellow, grey, and teal-ish blue (
you can find my inspiration here on Pinterest) so the first step was to clean the crap out of the sucker and sand it down like woah. Then I decided to spray paint it grey (since the couches are yellow and I have a different teal-colored-furniture project planned for the space already).
 |
Personal Photo -
"Classic Grey" Krylon Spray Paint |
Obviously I wasn't going to leave the thing plain and grey (you should know me better than that!) and originally I planned to find a cool grey/yellow/teal fabric and somehow affix it to the lower shelf. First problem - I couldn't find a fabric I liked. Second problem - I wasn't even 100% sure how I was going to accomplish what I was envisioning in my head. I probably would have used Mod Podge (I love me some Mod Podge) somehow, but the bottom line is, I wasn't sure how it would turn out. So, on to plan B -
stencil on my own pattern!
 |
Personal Photos -
Stenciling Supplies |
Since I had never stenciled (in my adult life at least, I'm sure I did as a child at some point) I decided to not cheap out on my supplies at all and I went Martha Stewart all the way. I had the stencils themselves, tape, spray adhesive (to prevent bleeding outside the stencil), stenciling paint brushes, and obviously paint. From there I decided to just wing it, to be quite honest. I mainly wanted to do the lower shelf, but I decided to add a bit of an accent on the top as well. I wasn't following any specific pattern or anything, just kinda following my instincts. And it turned out flipping awesome, if I do say so myself!
 |
| Personal Photos |
The colors are exactly what I wanted and the pattern is fun, but definitely not in your face. I'm not gonna lie, in real life it does
not look as perfect as it does in the photos, but it's a flipping DIY project - I don't expect it to end up looking perfect. It does, however, look pretty damn cool in my living room! Before I could put it to use though, I decided to finish it off with an acrylic spray. Mainly to protect the actual table (from dogs, and drinks, and life in general as an end table) but also to protect the stenciling. I trust krylon spray paint to hold up pretty well, but I'm not 100% sure about Martha Stewart craft paints...
 |
Personal Photo -
Krylon "Crystal Clear" Acrylic Coating |
Once that had ample time to dry (I'm pretty sure the directions said 2 hours, and I gave it an extra hour outside just to be safe) my lovely project was ready to be put to use:
 |
Personal Photos
PS - the throw pillows are from Target |
Ummmm...I'm obsessed. I want to invite people over my house just so I have people to show it off to. Yeah, I'm just that self-centered, haha. I also made some DIY coasters to coordinate with the table (as well as protect it even more from getting drink-damage) but that'll be a different post for a different day.
Are you as impressed with my table overhaul as I am?
Until next time...
PS - you'll probably notice this post was obviously not composed on my phone. Mainly because I was able to insert photos throughout the post (not to mention my phone probably would have exploded if I tried to publish a post with this many pictures). Unfortunately this does not mean I have my computer yet (I think my friend Shannon back in Pittsburgh is holding my shit hostage just to have something to complain about since she has a perfect baby {who doesn't cry}) - instead I chose to use one of the public computers in the "Community Center" in base housing since there were so many pictures.


It looks amazing! You did such a great job! :) Definitely 100% improvement from the before picture :)
ReplyDeleteWhoa, this looks so good! Great job!
ReplyDeleteDude! This end table is awesome!!! I wish I could come see it too :-) I might see stenciling in my future!
ReplyDeleteVery cute-where did you get the stenciling supplies!?!
ReplyDelete